Web applications
So now we’ve made a number of amazing Python programs that transform and generate text. But all of our programs run from the command-line. Wouldn’t it be nice if there were some way to make these programs more widely available? Wouldn’t it be nice if people could use our programs through, say, the World Wide Web?
Fortunately such a thing is possible. We can write a web application that provides an interface between our text generation code and human users with web browsers. And it’s easier than you think!
How the web works
Any computer on the Internet is capable of opening a network connection to another. For our purposes, you can think of these network connections as kind of like UNIX standard input and standard output: one computer (the “client”) opens a connection to another computer (the “server”). The client sends bytes to the server, and the server responds with bytes of its own.
A single “server” can have multiple programs running on it that respond to network connections. Such programs distinguish themselves from one another by listening to network connections on different “ports.” So for example, the program on a server that responds to network connections related to sending e-mail might listen for connections on port 25, while the program that responds to connections related to database services might listen on port 27017. In this chapter, we’ll write programs that listen for network connections, and we’ll need to select a port for the programs to listen to. We’ll need to select a port that isn’t already in use by another program.
Some port numbers are associated by convention with particular services. Notably, port 80 is considered the “default” port for communicating with server programs that serve web pages.
A language in common
As explained above, the Internet allows a client computer to send bytes to a server computer, and get bytes in return. But two programs can’t meaningfully communicate with one another unless they speak a common language—unless they have a set of rules in common that dictate what the data sent between them should look like and what that data “means.” Over the history of the Internet, industrious individuals have taken it upon themselves to invent such languages. The official word for these languages is “protocol.”
There are hundreds of protocols in use on the Internet. As you’re reading this, your computer is likely using dozens of them simultaneously to communicate with other computers on the Internet (or between programs on your own computer). There’s a protocol for sending mail, a protocol for looking up domain names, a protocol for peer-to-peer file sharing and more.
HyperText Transfer Protocol
The protocol used by the web—i.e., the protocol that web browsers use to talk
to web servers—is called HTTP (HyperText Transfer Protocol). In many ways,
HTTP is a very straightforward protocol—so straightforward that it’s possible
for us to write requests by hand, essentially doing the work on our own that
we would normally delegate to a web browser. To do this, we’re going to use
a utility called netcat (typed nc). Netcat allows us to connect to arbitrary
ports on arbitrary servers and type in whatever text we want. Here’s how to
use netcat to speak HTTP to the server where the schedule for Reading and
Writing Electronic Text resides:
$ nc rwet.decontextualize.com 80
GET /schedule.html HTTP/1.1
Host: rwet.decontextualize.com
What you just typed in is known as the HTTP request. It’s the information
that the client sends to the server, prompting the server to respond. After you
type the line beginning with Host:, hit enter twice, and you should see some
output that looks like this:
HTTP/1.1 200 OK
Server: nginx
Date: Mon, 20 Apr 2015 05:14:43 GMT
Content-Type: text/html
Content-Length: 15433
Connection: keep-alive
Vary: Accept-Encoding
Last-Modified: Wed, 15 Apr 2015 19:13:26 GMT
ETag: "188600cb-3c49-513c8243e4180"
Accept-Ranges: bytes

<!DOCTYPE HTML PUBLIC "-//W3C//DTD HTML 4.01//EN"
	"http://www.w3.org/TR/html4/strict.dtd">
<html>
[...more html follows...]
This is the HTTP response. This is what the server sends to the client in response to its request. Let’s talk a bit about the specific structure of both response and request.
HTTP Requests
An HTTP request consists of three things:
- The first line, which contains the method, path and HTTP version;
- a series of headers, which are key/value pairs separated by colons; and
- optionally, a request body.
I’ll point out these parts using the request we just made with netcat.
GET /schedule.html HTTP/1.1
Host: rwet.decontextualize.com
In this request, GET is the method; /schedule.html is the path, and
HTTP/1.1 is the HTTP version. There’s only one header in this request:
Host. You have to include a Host header for every HTTP/1.1 request, and the
header must be set to the domain name of the server that you’re sending the
request to. This request, translated into English, means essentially this:
“Hey, web server! I want to get the document at the path /schedule.html on
your server. I’m speaking HTTP/1.1 (and not a newer or older version of the
protocol). In case you didn’t know, the host that I’m making this request to is
rwet.decontextualize.com.”
This request has no body. A body is sent with a request only when the request is doing something like submitting data from a form, or uploading a file. In fact, you can’t send a body with a GET request at all; bodies are only supported for POST and PUT requests.
HTTP Methods
But wait, what are all of these “methods”? What do they mean? Why is there more than one? That’s a good question! In HTTP, the method is a verb that specifies what the client wants the server to do with the document named in the path. There is a closed set of valid HTTP verbs, meaning you can’t just make new ones up on the fly. How exactly the server interprets these verbs is specific to each web application, but in general the verbs have the following uses:
GET: Client wants the server to return the content of the resource named in the path.PUT: Client wants to modify the contents of the resource named in the path, or create a new resource with the given path.POST: Client wants to add to or modify the resource.DELETE: Client wants to remove the resource.HEAD: Client wants to check to see whether or not the resource exists, and maybe get metadata about the resource, without necessarily fetching the contents of the resource.OPTIONS: Client wants to know which of the above methods are supported for the given resource.
As you can see, the meanings of these verbs overlap in strange ways (e.g., it’s
not clear what the difference between POST and PUT is, since both are used
to add and modify resources). Every web service uses these verbs slightly
differently, and when you implement a web service, you need to make decisions
about what the verbs “mean.” It’s best to stick to convention, but there’s
nothing stopping you from making your application accept GET requests that
delete resources, or POST requests that return resources instead of modifying
them.
Most web applications make use only of the verbs GET and POST. This is
because most web browsers only support those two methods (though with the
advent of HTML5, the situation is changing). Even today, if you’re developing a
web application—especially one that’s designed for browsers, and not
necessarily for automated agents—you’re safe making your service only support
GET and POST.
HTTP Responses
The response we received from the web server in the netcat example above looked like this:
HTTP/1.1 200 OK
Server: nginx
Date: Mon, 20 Apr 2015 05:14:43 GMT
Content-Type: text/html
Content-Length: 15433
Connection: keep-alive
Vary: Accept-Encoding
Last-Modified: Wed, 15 Apr 2015 19:13:26 GMT
ETag: "188600cb-3c49-513c8243e4180"
Accept-Ranges: bytes

<!DOCTYPE HTML PUBLIC "-//W3C//DTD HTML 4.01//EN"
	"http://www.w3.org/TR/html4/strict.dtd">
<html>
[...more html follows...]
This is the response. The response consists of the status line, a series of
one or more headers, and then the body of the response. The status line has the
HTTP version and a number that indicates the status of the request—this is
the so-called HTTP “status code.” 200 means “okay, here’s your data”; 404
means “I couldn’t find the resource you wanted.” There are dozens of other
codes with various meanings and conventional uses.
The headers tell us information about the response, such as how many bytes are in it (the Content-Length header), what kind of document it is (the Content-Type header), and when the document was last modified (the Last-Modified header). Some of the headers are required; some are optional. The client needs to know
this information so that it can properly download the data and display it to
the user.
After the headers, we see the response body. The response body is simply the data contained in the resource that the client requested. On the web, response bodies are usually HTML documents, but they can also be other things, like images, PDFs, MP3s, etc. Web APIs generally return JSON documents, not HTML.
Web frameworks
We’ve already discussed in this class how to make web
requests.
You could just type in all your web requests by hand, but it’s easier to have
an application (like a web browser, or curl) or a library (like urllib) do
it for you. These tools abstract away all the work of formatting the request
correctly, including the right headers, etc. so you can just get your work
done.
It’s the same situation with writing a web server—a program that receives web requests and then respond to them. You could write a program that listens on the network for incoming connections, parses HTTP requests according to the HTTP standard, then sends responses in the correct format. But that would be a hassle! It turns out that enterprising programmers have already done that work for us—the work of making a program that listens for HTTP requests and responds to them. That work takes the form of a web framework—a kind of “skeleton” for a web server that has all the difficult stuff already taken care of.
The framework gives you access to everything in the HTTP request in a clean, abstrated way: the path of the request, the HTTP method, the body of the request, any headers, and the query string. Your job is to write rules and code that specify what should happen when requests are received. What should the response code be? What should the response body look like? And so forth.
Web frameworks also commonly supply functionality to make writing web applications easier, such as HTML template rendering and database connection abstraction.
There are a number of “frameworks” for Python. They all have benefits and drawbacks. Here are a few well-known frameworks:
- Django: a full-featured “full stack” web framework. Robust but complex.
- Tornado: a barebones web framework that uses asynchronous I/O for extreme scalability.
- Bottle: a fast and simple “microframework” with no external dependencies.
Flask
Today we’re going to use a framework called Flask. I chose Flask because it’s easy to get started with, but has a clear path for making more advanced web applications when you’re ready to take off the training wheels. There’s also an active developer community producing helpful Flask extensions and extensive, beginner-friendly documentation.
In particular, we’re going to use Flask to take the text manipulation and text generation projects that we’ve made so far and turn them into simple web applications. In the process, we’re just going to scratch the surface of what’s possible with Flask, but hopefully it’ll be enough to whet your appetite and help you understand the basic concepts.
Installation
To install Flask, first ensure you have pip and virtualenv installed on your system. Then, create and activate a virtual environment for your first Flask application:
$ virtualenv venv
$ source venv/bin/activate
Then, use pip to install Flask:
$ pip install Flask
A simple hello
Let’s make our first Flask application. Open a new file and paste this in:
from flask import Flask
import random

app = Flask(__name__)

greets = ["Hello", "Hi", "Salutations", "Greetings", "Hey", "Sup"]
places = ["region", "continent", "world", "solar system",
  "galaxy"]

@app.route('/hello')
def hello():
  greeting = random.choice(greets) + ", " + random.choice(places)
  return greeting + "\n"

if __name__ == '__main__':
  app.run()
In one terminal window, run this program like so:
$ python greetings.py
It looks like the program is hanging, but it’s actually just waiting—waiting for someone to make a web request. You can go to the following URL in your browser in order to make a request to your application:
http://localhost:5000/hello
Or, you can use curl. Here’s what it looks like when we use curl to make a
web request to the application:
$ curl -s http://localhost:5000/hello
Greetings, solar system
Hey, great! We’ve made a simple “Hello, world” application. When you’re done basking in the glory of being a back-end Python web developer, you can hit Ctrl-C in the window where you ran the Flask application in order to stop the web server.
But how does it work?
Let’s go down this example line by line.
from flask import Flask
import random

app = Flask(__name__)
These lines import the Flask class from the flask module and import the
random module as well. (You don’t need to import random in order to use Flask, but we’re using it as part of our application logic later in the program.)
The variable app will contain a Flask application object.
greets = ["Hello", "Hi", "Salutations", "Greetings", "Hey", "Sup"]
places = ["region", "continent", "world", "solar system",
  "galaxy"]
These lines create some lists of strings that we’re going to use in our web application.
@app.route('/hello')
def hello():
  greeting = random.choice(greets) + ", " + random.choice(places)
  return greeting + "\n"
These lines define a function called hello. This function selects random
items from the greets and places lists, and then returns the resulting
string. What makes this function special is the line right above its
definition: @app.route('/hello'). This is a special “decorator” that tells
Flask to run this function whenever the application gets a request to the path
/hello. The main work of writing a Flask application is defining functions
and then associating them with paths to run when a particular path is in the
HTTP request. You can write as many functions that respond to as many paths as
you want.
“Decorator” is the real, actual name for that funny line beginning with
@. You don’t need to understand decorators in great detail in order to use Flask—you can just think of them as a funny bit of syntax that you have to put before a function definition in order to let Flask know what the function is for and when it should be called. But if you’re interested, here’s a good tutorial about decorators, what they’re good for, and how to make your own.
Now that we’ve created the Flask application object and associated it with some functions, we need to actually run the application. That’s what happens in the last few lines:
if __name__ == '__main__':
  app.run()
The app.run() method starts the Flask application, which then runs forever,
eagerly waiting for incoming web requests.
Spice up your requests with query strings
One of the primary ways that we can make our web applications responsive to user input is by using query strings. Quick refresher: a query string is the strange thing you see at the end of URLs sometimes that begins with a question mark and has ampersands and equal signs, like this:
http://example.com/foo?color=green&texture=bumpy
Query strings are an easily implemented, standard interface for providing
parameters and variables to your web application. Here’s a simple web
application for returning a word that rhymes with the word contained in the
user-supplied string. To run this example, you’ll first need to install
pronouncing:
pip install pronouncing
from flask import Flask, request
import pronouncing
import random

app = Flask(__name__)

@app.route('/rhyme')
def define():
  word_str = request.args['word']
  rhymes = pronouncing.rhymes(word_str.lower())
  if len(rhymes) > 0:
    return random.choice(rhymes) + "\n"
  else:
    return "no rhymes found :(\n"

if __name__ == '__main__':
  app.run()
You can load this program in your web browser by going to
http://localhost:5000/rhyme?word=x, replacing x with a word of your choice.
Or you can test it out with curl like so:
$ curl -s http://localhost:5000/rhyme?word=university
biodiversity
The trick to getting at the query string is an object that comes with Flask
called request. To use request, you need to include it as a name that
you’re importing from the flask library, like so:
from flask import Flask, request
Inside of a function with a route decoration (like define in the above
example), the request object will have attributes associated with the current
HTTP request. One of those attributes is args, which is a dictionary mapping
query string keys to query string values. So the following line, for example,
will store in word_str the value for the key word in the query string:
word_str = request.args['word']
The case of the missing parameters
But what happens if the URL doesn’t include a word key? Or if there isn’t
a query string at all? Let’s find out:
$ curl -s http://localhost:5000/rhyme
<!DOCTYPE HTML PUBLIC "-//W3C//DTD HTML 3.2 Final//EN">
<title>400 Bad Request</title>
<h1>Bad Request</h1>
<p>The browser (or proxy) sent a request that this server could not understand.</p>
Oh gross. It looks like the application is returning an awful error message.
How we can we get around this and display something nicer? One possibility is
to use the dictionary object’s get method, which attempts to fetch the
value of a key but resorts to a default if the key isn’t found. Here’s a
version of plural.py with such a solution in place.
from flask import Flask, request
import pronouncing
import random

app = Flask(__name__)

@app.route('/rhyme')
def define():
  word_str = request.args['word']
  if len(word_str) == 0:
    return "no word specified!\n"
  else:
    rhymes = pronouncing.rhymes(word_str.lower())
    if len(rhymes) > 0:
        return random.choice(rhymes) + "\n"
    else:
        return "no rhymes found :(\n"

if __name__ == '__main__':
  app.run()
Here’s what happens when no word parameter is supplied now:
$ curl -s http://localhost:5000/rhyme
<!DOCTYPE HTML PUBLIC "-//W3C//DTD HTML 3.2 Final//EN">
<title>400 Bad Request</title>
<h1>Bad Request</h1>
<p>The browser (or proxy) sent a request that this server could not understand.</p>
But it still works as expected with a word parameter:
$ curl -s http://localhost:5000/rhyme?word=knife
saif
Debug mode
When we’re developing our web application, we can turn on “debug” mode to see
exactly where in our code the error occured. To turn on debug mode, pass a
debug parameter to the application’s run method with a value of True,
like so:
app.run(debug=True)
Templates
So far, all of our examples have had as their output simple strings of text.
This is fine for testing, but what we’d actually like is to have our web
application display a nice pretty web page. Anything that is in the return
value for the function that handled the request will go straight to the
browser, so one way to display HTML would be to simply put some HTML code in a
big string and return it:
@app.route('/hello')
def hello():
  greeting = random.choice(greets) + ", " + random.choice(places)
  return "<html><h1>Welcome to Greet-O-Tron 2K15</h1>" + \
    "<h2>Your Greeting Is...</h2>" + \
    "<p>" + greeting + "</p>";
This would work, but it’s a little ungainly and inconvenient. For one, the HTML is inside the code, so you have to modify the Python file if you want to tweak the way that the application looks. It’s often the case that separate members of the team developing a web applications will work on different parts: one person will work on the Python code, while another will work on the HTML front-end. For both of these reasons, it’s convenient to separate out the HTML content in a separate file.
Flask (as with other web frameworks) offers this functionality in the form of templates. A template is basically an HTML file that has a bit of extra syntax in it able to include data from the Python application in the HTML output. Templates live in separate files, so they can be edited apart from the Python code.
Let’s make a version of our greeting generator that uses templates. The Python code looks mostly the same, with a few additions, which I will discuss below.
from flask import Flask, render_template
import random

app = Flask(__name__)

greets = ["Hello", "Hi", "Salutations", "Greetings", "Hey", "Sup"]
places = ["region", "continent", "world", "solar system",
  "galaxy"]

@app.route('/hello')
def hello():
  greeting = random.choice(greets) + ", " + random.choice(places)
  return render_template("greeting.html",
    greet=random.choice(greets), place=random.choice(place))

if __name__ == '__main__':
  app.run()
The template file itself needs to live in a separate directory called
templates. Make this directory and then put the following code into a file
called greeting.html:
<!doctype html>
<html>
<head>
  <title>Greetings!</title>
  <style type="text/css">
    body {
      max-width: 600px;
      font-family: 'Courier New', Courier, monospace;
      margin: 1em auto;
    }
  </style>
</head>
<body>
  <h1>I am Greet-O-Tron 2K15. I have prepared for you this greeting.</h1>
  <p>{{ greet }}, {{ place }}</p>
</body>
</html>
Try running the program and then viewing it in a browser. You’ll see something that looks like this:
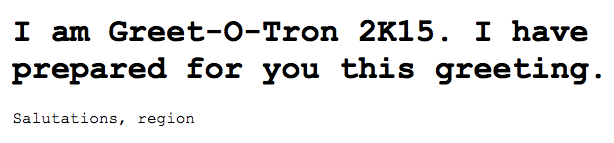
As you can see, the HTML page is now displaying our output! Awesome. Here’s how
it all works. Let’s look at what’s happening in our Python file first. Step one
is to include the render_template function from the Flask library:
from flask import Flask, render_template
Then, instead of returning a string literal in our handler function, we instead
call render_template. This function takes a filename as its first
argument, which specifies which template file to use. (It looks for template files in a subdirectory called templates.) You can then give the function any
number of keyword parameters.
The render_template function does this, essentially:
- It reads in the template file as a string.
- Whenever it encounters `` (where
namecan be any Python variable name) in the contents of the template, it performs a replacement, inserting instead the value for the keyword argumentnameas passed to the function. - It returns the contents of the template file with those transformations applied.
Simple variable replacement like this will get you a long way in web development. But Flask’s templating engine, Jinja2, supports much more sophisticated functionality—worth checking out if you want to build a non-toy web application with Flask.
Form submissions
We now have a fully functional, web-accessible text generator. The next task I want to set before us is to make a web application that acts on user-supplied text. The easiest way to do this is with an HTML form. A form in HTML looks like this:
<form action="/path" method="POST">
<!-- include input elements here, such as... -->
<input type="text" name="foo" value="Type text here"><br>
<textarea name="bar" rows="10" cols="40">Type even more text</textarea><br>
<input type="submit" value="Submit!">
</form>
This HTML code will look like this in the browser:
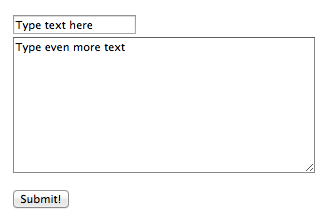
The key to understanding HTML forms is this: they instruct the browser on how
to make a request to your application—specifically, how to send the
information in the form to your web application when the user clicks “Submit.”
The attributes of the <form> tag are key: the action attribute indicates
what path the browser should make a request to; the method attribute
indicates what HTTP method the browser should use. When the user clicks
Submit, the information in the form will be sent to your application, with
the name attributes of each form element specifying the keys and whatever the
user types in for those fields as the values.
(You usually want to use POST for forms, but you can also use GET. The only
difference is that a POST request will put the parameters in the HTTP request
body, while a GET request will put them in the query string.)
To make an application that uses an HTML form, we need to have two handler
functions. One to display the page that shows the form, and another to respond
to the request that the browser will do when the user clicks Submit on the
form.
Here’s a simple web application that does this. Whatever the user types in the form will be parsed into words and replaced at random with words that rhyme.
from flask import Flask, request, render_template
import pronouncing
import random

app = Flask(__name__)

@app.route('/')
def home():
  return render_template("rhyme_home.html")

@app.route('/rhyming', methods=["POST"])
def transformed():
  text = request.form['text']
  output = list()
  words = text.split()
  for word in words:
    rhymes = pronouncing.rhymes(word)
    if random.randrange(4) == 0 and len(rhymes) > 0:
      output.append(random.choice(rhymes))
    else:
      output.append(word)
  return render_template("rhyme_results.html",
    output=' '.join(output))

if __name__ == '__main__':
  app.run()
Now create these two files in your templates directory:
<!doctype html>
<html>
<head>
  <title>Rhyme Your Text</title>
  <style type="text/css">
    body { max-width: 600px; margin: 1em auto; }
  </style>
</head>
<body>
  <h1>Remix any text with rhyming.</h1>
  <p>Enter some text below. Words will be replaced at random with other words
  that rhyme.</p>
  <form action="/rhyming" method="POST">
  <textarea name="text" rows="24" cols="66"></textarea><br>
  <input type="submit" value="Submit!">
  </form>
</body>
</html>
… and …
<!doctype html>
<html>
<head>
  <title>Your text, rhymed</title>
  <style type="text/css">
    body { max-width: 600px; margin: 1em auto; }
  </style>
</head>
<body>
  <h1>Here's your text!</h1>
  <p>{{ output }}</p>
</body>
</html>
If you go to your application’s root url (http://localhost:5000/), you’ll
see the following (I’ve already pasted in the text of a speech from President
45):

Paste in some text and click ‘Submit’. You’ll get something back that looks like this:

There are a lot of moving parts in this example. (Further explanation TK.)
Writing JSON responses
Making a simple web API with Flask is easy. Use the jsonify() function from
the Flask library to return the results in JSON format.
from flask import Flask, request, jsonify
import pronouncing
import random

app = Flask(__name__)

@app.route('/rhymes.json', methods=["GET"])
def transformed():
  text = request.args['text']
  output = list()
  words = text.split()
  for word in words:
    rhymes = pronouncing.rhymes(word)
    if random.randrange(4) == 0 and len(rhymes) > 0:
      output.append(random.choice(rhymes))
    else:
      output.append(word)
  return jsonify({'response': output})

if __name__ == '__main__':
  app.run()
Accessing it with curl:
$ curl -s http://localhost:5000/rhymes.json?text=now+is+the+winter+of+our+discontent
{
  "response": [
    "now",
    "is",
    "the",
    "winter",
    "vanhove",
    "scour",
    "discontent"
  ]
}
Further reading
- Flask official documentation
- RESTful Web APIs by Leonard Richardson and Mike Amundsen is the book to read about HTTP.
- Deploying Flask apps on Heroku
- Deploying Flask with uWSGI on DigitalOcean